Hi, folks! I’m not sure if anyone is even reading this blog these days, but I wanted to let you know that I’m putting more attention into my somatic wellness blog and business these days. At Fenhaven Somatics, you’ll find:
I dehydrate a LOT of cabbage. And every time I mention that I do, people ask me what on earth I do with it.
Mostly, I use it for quick vegetable filler in soups and rice dishes. Along with dehydrated kale, zucchini, and onions (usually green), I put it in almost anything I’m cooking with broth in the winter. It’s one of my “secret kitchen prep hacks” that lets either of us throw dinner together in, like, 20 minutes. Perfect for those nights I Just Can’t With The Cooking.
So here are some things we make a lot:
Weeknight paella – this is more like a paella valenciana, so it has chicken and sausage, but no seafood. Vegan options possible.
Dehydrating zucchini is one of my go-to food preservation methods. I like both shreds and cubes and I use them in soup, meatballs, and rice dishes all winter long. And it’s so fast to do, if you have the right tools.
What you’ll need
Several “monster” zucchini or other summer squash – the 3-4lb “baseball bats” that you’d otherwise compost are perfect.
A big knife and a cutting board
An ice cream scoop, preferably the kind without the thumb lever
A food processor with a shredding or dicing blade
A food dehydrator – doesn’t need to be fancy, though silicone mesh sheets are a big bonus
How to do it
Use an ice cream scoop to remove the seeds and spongy bitsOne 3.5 lb zucchini fills my 13-cup Kitchenaid food processor with cubes. Those cubes will fill 3 dehydrator trays. So, 2 giant squash are one full dehydrator load. I love these silicone mesh sheets – zucchini can be sticky, especially shreds, and these make it much easier to clean up.
Wash your zucchini and cut into sticks that will fit into the feed tube of your food processor.
Use your ice cream scoop to scoop out the seeds and spongy middle part of the squash. If the skin is too tough to cut with your fingernail, peel it, too.
Blitz it through the food processor.
Spread on dehydrator sheets. You don’t need to be precious about cubes/shreds touching.
Dehydrate. Timing will depend on your dehydrator and the size of your pieces.
To save on cleanup, I diced two more zukes at the same time. They’re waiting in a bowl and when the dehydrator is free, it’ll take maybe 10 minutes to take out the first batch and start the second batch.
Total time from setup to a batch in the dehydrator, a bowl waiting for the next load, and a clean kitchen? About 35 minutes.
A friend has recently been having trouble with a landlord who won’t fix her broken fridge, so I pulled together some meal ideas that don’t require a fridge, daily shopping, or expensive prepackaged specialty foods. Given how often power seems to be going out these days, I thought I’d share it here, too. Enjoy!
Wild ramps have a special place in my heart. They were one of the first herbs I ever foraged, and they just seem joyful to me! listen in as I enthuse about this patch and it’s 20-year history of travel and transplantation.
I’ve been working on putting the garden to bed for a few weeks now. With this weekend’s frost, even the monster squash plant that was threatening to vault the fence and eat the house has died back a bit, so it’s more than time. I’m also thrilled that I can see my kitchen table again, out from under the piles of produce waiting to be dried, canned, or otherwise dealt-with.
As the annual vegetable garden winds down, I’m remembering that I had some longer-term garden goals this year, and I’m delighted to find that they chugged along without much attention since I put them in motion this spring.
The first was All The Alliums. I think I’m giving up on bulb onions; they never do well for me, and last year I discovered that I can dry scallions en masse and we will happily use those in most recipes I’d ordinarily start with a chopped onion. And by scallions, I mean the gigantic green onions as big as my thumb and 2-3′ tall that the garden seems happy to throw my way effortlessly. And which also divide themselves readily and seemingly endlessly. And they are supposedly great for orchards, too, befuddling pests and feeding pollinators. So many wins! So this spring, I started three different kinds from seed. I think one of those died entirely, and I don’t really remember which two made it, but they grew quite well. I haven’t harvested them yet, except an individual here and there, but there are probably a couple dozen. I’ll clip them close to the ground and they should resprout and probably divide in the spring. Then I’ll start planting them out and about the garden and orchard.
Three-foot long scallions, thicker than my thumb!
The other allium-of-my-heart is Sacred Forest Garlic. I confess, I originally bought it for the name. But it turns out it is a phenomenal plant: a garlic-like bulb, a leek-like stem, and the flavor of wild ramps. It is divine. I have been working for several years now to propagate it out. It’s been slow going, waiting for the bulb to divide like garlic, but it made a big leap forward this year because two bulbs set seed in 2021. I sprouted those and got maybe 15-20 viable plants this year. Between those and the divided bulbs of the older plants, I’ve now got enough plants that I’ve lost count of how many individuals I have! It’s probably around 3 dozen or so. The only problem is I’ve also got a ton of regular garlic this year, and it might be hard to tell them apart visually. Aroma should help. Oh, and garlic scapes curl, so that will also differentiate. I did harvest enough to make herbes salees with a couple stalks, and it’s really amazing. Just fresh green Sacred Forest Garlic and salt pulverized together in the blender and used to flavor soup stock and the like. Really, really tasty.
The other fun fall surprise is that my winecap mushroom beds finally fruited! Winecaps grow on woodchips, and all my garden paths are covered in woodchips. And mushroom mycelium is good for soil fertility, so it seemed worth a shot. Turns out, winecap mushrooms are my new favorite fungus! Super tasty – I know a lot of mushrooms get called “meaty” but these really live up to the descriptor. I’ve eaten a bunch just sautéed and also dried quite a few. It’s getting cold, so I’m not sure how many more I’ll get, but I’ve harvested about 3 lb so far.
The orchard has had a rough start. Two fruit trees died outright, and I’m not sure why. Pretty much all the tiny plum trees (5/6) never really got started, though the bigger plums are doing OK. Then we had a storm and a giant hickory tree fell on the orchard. It sheared the limbs off 2/4 espaliered apples and knocked down the fence…so the deer came in and ate the leaves off 2 apples and 3/4 hazelnuts. I have some hope they can come back…time will tell. But most of the willow rooted well, the plums are OK, and I added two nannyberries. The hickory tree is on its way to being firewood, and the fence is back up. I still want to fence the individual trees before winter, just in case. So, the orchard is starting to get its feet under it. We’ll see how it goes.
Other milestones:
Next spring will be the 3rd year for the asparagus, so we get to start eating it!
I had a monarch caterpillar on the milkweed, oodles of hoverflies on the tulsi, and parasitic wasps on a tomato hornworm
I learned I can, in fact, grow meaningful quantities of tomatoes…but maybe not peppers
If you’re feeling the need to be growing some of your own food, but aren’t sure you will have enough time to tend a fussy garden, here are some suggestions of what to grow. These don’t take a lot of tending, don’t have a lot of pest problems, and it doesn’t much matter if you harvest them regularly. Cooking and storing of most of these are really easy, too.
Potatoes. Plant, water well, and cover with about 9″ of straw. If you get regular rain, you might not need to even water these. Harvest potatoes starting a few weeks after they flower through frost. You’ll get “baby potatoes” at first and end up with ones you can store in a bucket of peat moss in the garage well into the winter. Sweet potatoes are another decent option, though they like more heat and better soil.
Butternut squash. Plant on the edge of a bed and let them run out into the yard. Harvest when small and green and eat them like zucchini. As they get bigger, you might need to peel/seed them, but you can still eat them like summer squash. Let some get big and fully ripe. Harvest when the stem is brown and let them cure in a warm place indoors for a couple weeks – then they’ll keep in a cool spot, like a basement, until spring. Butternuts resist squash borers better than most squash and keep the longest.
Pole beans. Eat them young as green beans. If they get too tough, let them dry and eat them like dry beans or save them to plant next year.
Swiss chard. Grows from early spring through fall, even after some frost. Not bothered by cabbage moths. Regrows like crazy – the more you pick, the more it grows. But, if you don’t harvest it for a few weeks, it won’t go to seed or become unusable, either. If you prefer kale, get a curly variety, which tends to resist cabbage moths better. Green glaze collards are also amazing – tender and less attractive to cabbage moths.
Chives. Will come up every year. Use for oniony flavor instead of onions or scallions (add toward the end of cooking). Flowers are edible. Once the blooms start getting papery, cut the whole clump off about 3″ tall to get rid of the woody stems quickly. It’ll regrow in a couple of weeks.
Onions. Get onion sets (tiny bulbs) or plants (the size of a pencil). Harvest at any stage, from green onions to fresh knob onions to dry bulb onions.
Tomatoes. One cherry tomato plant will keep you in sweet salad fruit for the entire summer. If you want a couple slicing tomatoes every week, get one or two “indeterminate” plants. If you want a pile of tomatoes more or less all at once for canning, get “determinate” plants. Since I don’t really eat fresh tomatoes, I usually prefer to buy half a bushel of tomatoes at the market on the day I’m canning rather than dealing with tomato plants all summer.
Garlic. In the fall, shove some garlic cloves in the ground and mulch. Harvest next summer all at once.
Spinach. When you plant the garlic, also plant some spinach seed. It’ll be the first greens you harvest next year.
Grocery store plums have never excited me. But you know…neither have grocery store tomatoes. I’m starting to see it’s all about the variety and how you eat them.
My love affair starts on the tree. How gorgeous are these? They look like jewels. I almost can’t believe they are a plant.
Empress plums on the tree. Photo courtesy of Lesser Farms and Orchard.
The orchard around the corner from me (Lesser Farms and Orchard) has two kinds of plums every fall: the old standard Stanley plums and Empress plums. Both are “European” or “prune” style plums, as distinct from the rounder “Japanese” style plums, which is what you’re most likely to find in the store. Both are oval, black-purple on the outside, and yellow bleeding to red on the inside. The Empress are twice the size of the Stanleys and at least twice as juicy. They are also about 600% better tasting! (I’m pretty sure they grow the Stanleys just to pollinate the Empress plums.)
The flavor and texture of the Empresses change depending on ripeness. The first batch I got were still pretty hard and very tart. But as I let them ripen on the counter, they got softer, jucier, and sweeter. What I love about them is that the skins stay tart, which goes incredibly well with the super-sweet flesh. This sweet-tart combo stays after preservation, whether dried, sauced, or sliced and canned. Every time I eat these, I just marvel at how amazing they taste. It’s a party in my mouth. I probably ate 10 pounds of plums out of hand this year. But I probably bought 30 pounds, so let’s talk about how I preserved these.
Canned slices. I’ve done these in the past, and they almost fell apart in the syrup. They were good, but this year, I tried canning them when they were slightly under-ripe (more firm and tart). This worked much better. The plum-infused syrup is a delicious product in its own right…I’ll have to figure out what to do with that! Adding a lot of gelatin and making “sugar plum gummies” seems like a good place to start…
Sauce. Just like you’d make apple sauce – cook them down, then puree. I just used a stick blender. I think I macerated them with a little sugar before cooking. The result is almost too intense to eat straight, so I mixed it 1:3 with homemade apple sauce. The result is out of this world.
Half-dried. I like prunes, and I figured these would make good ones. Wash, cut in half, remove pit, “pop the backs” (i.e., press your thumb into the round back and sorta turn the half inside out) and if needed, slash the tops so they lay flat. Put them in the dehydrator, skin side down, and then…magic happened. After about 4 hours, they were warm throughout, starting to dry on top and caramelize on the thin edges, and had produced their own syrup in the “cup” of the skin. I had to exert a lot of self-control to not eat ten plums at one sitting. They were possibly the best food I’ve ever eaten. And there’s absolutely no way you could store them at that stage. If you visit me during plum season, and I have thought ahead to ripen the plums before you arrive, and if we can wait 4 hours for dessert, I will make them for you. And that will show you just how much I love you. If I only really, really like you, or the timing is wrong, I may share with you the stored version, which is dried around 10 hours and which I keep in the fridge or freezer because they are too sticky to be shelf-stable.
/ These were by far the best ways I preserved them. I’ve also made various kinds of savory sauces, and I tried trying the Stanleys until they were shelf-stable dry. The grilling sauce was pretty good, as was adding plums to green tomato chutney, but the dried Stanleys are not good out of hand. I’ll have to stew them like Nannie did…and even then, they won’t be amazing because the Stanleys don’t have that tartness that makes the Empresses so flavorful.
I’ve only seen Empress plums at one place besides Lesser’s farm – Hale Groves will send you 5 lbs (12 plums!) for $36 plus shipping. Or, you can stop by Lesser’s in early October and get a bushel (~50lb) for that price, and no shipping fee. Unless I’ve bought them all first!
I’m so lucky to be able to get amazing fruit at these prices.
I dehydrated two kinds of onions this year, and I’m pleasantly surprised with the results!
The final haul: a gallon of green and a pint of yellow onions
The yellow onions were slightly chewy and sweet
This summer, I diced several large onions (I forget if they were yellow or white) and dehydrated them. I’m forgetting the details; I think it was three huge onions (about 3 pounds) and it filled 6 dehydrator trays, which dried down to a pint of dried diced onions. These are fine; they are fairly equivalent to the dried onions you get in the spice aisle of the grocery store. They’re a little bigger, chewier, and more flavorful (sweeter). Since I paid for the onions, this was not a huge cost savings. I’m not sure I’d do them again.
This fall, I harvested all the scallions in my garden just before the first snow. It was an ENORMOUS pile of onions, and I used the whole thing from stem to about 2″ above the root ends. I replanted the roots (or just left them in place in the garden) so those should all come back next year with no fuss. IIRC these were Nabechan scallions, but they could be Welsh Onions or another variety. I’ve planted several kinds but didn’t keep track of what survived. These have been pumping out onions for years and I rarely remember to use them. They grow about 30″ tall from root to tip and are about as big around as my thumb.
I don’t actually know how big this bowl is. 20 cups, maybe? Pint glass and quart jar for scale.
Because these are so light, I just piled them onto trays. I think they took about 8 hours all told, stirring a couple times. The giant bowl (20 cups?) didn’t shrink much because of the shape of the “scallion rings,” and I ended up with two half-gallon mason jars of dried green onions.
These are actually much more aromatic than the white ones! And they add a very nice pop of green to dull winter meals. So far, I’ve used them in soup, rice pilaf, and some one-pan dishes. They are obviously not as good as fresh, but they are way better than any other dried onion product I’ve used. On weeknights, my decision is often “fuss with an onion vs. skip onion altogether,” so at least this makes adding onion easy.
Best of all, scallions grow robustly, overwinter for years on end, divide themselves readily, and produce vastly more than any bulb onion I’ve every tried to grow, yielding piles of free alliums that I can now use all winter! This is a total win – I’ll definitely be doing these again.
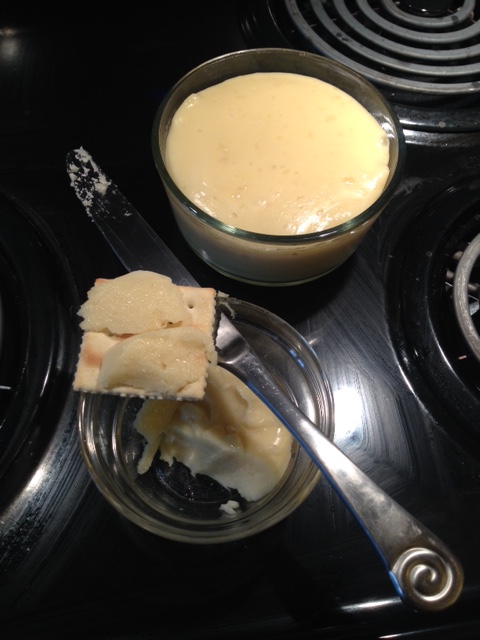
Non-dairy cheese made with soy milk and coconut oil
Skye Michael Conroy is a vegan food scientist who analyzed what it is about cheese that tastes good and makes us happy, then did a ton of experimentation until settling on a group of recipes and a method for making soy- and almond-based cheeses (and some cashew-based ones, too). I highly recommend buying The Non-Dairy Evolution Cookbook for the full set of recipes, and to credit a very hardworking author who spent a LOT of time figuring out how to make nondairy cheeses taste good. (Note that though the recipe itself is not subject to copyright, I still encourage you to support the originator of these recipes.)
I like these cheeses and make them regularly. They are cheaper than store bought, taste good, and melt well in the microwave (not so much in the oven, though). My only quibble with the cookbook is the methods – which seem far too complicated – and the way the recipes are written out. For example, the vinegar is listed at the beginning of the recipe, but is added at the last step. Also, most of the block cheeses follow the same basic pattern, but they are spread out over a dozen or more pages. Also, her recipes make just a bit more than 2 cups, and all my glass containers hold 2 cups max.
So, for my own use, I rewrote the ingredient list and instructions like this:
Qty
Jack
Brie
Mozzarella
Soy milk
Cup
1
1
1
Tapioca flour/starch
Tbl
3
3
3
Kappa carageenan
Tsp.
3
1
3
Salt
Tsp.
1
0.75
1
Nutr. yeast
Tbl.
1.5
0.75
0
Mellow white miso
Tbl.
0
0.75
0
Coconut oil (refined)
Cup
0.5
1/3
0.5
Lemon juice
Tsp.
0.75
0
2.25
Vinegar
Tsp.
1.5
1.5
0
Add tapioca and carageenan to pan of cold soymilk. Heat and whisk until dissolved.
Add salt, yeast, and miso. (Thin miso with 1 Tbl. soy milk first.)
Add melted coconut oil. It will be very separated at first.
Heat and stir until temp reaches 175F or pulls away from sides.
Add lemon juice and/or vinegar. Stir briskly – you might need to switch to a rubber spatula.
Immediately pour into 2c mold and chill.
Notes:
Make sure your soy milk is made from just soy beans and water. Eden brand (unsweetened) is great; so is homemade. I’ve not tried it with other non-dairy milks and am not sure it would work – let me know if it works for you.
Use kappa carageenan, available online. There are other types; be sure you use kappa type.
Tapioca flour and tapioca starch are the same thing.
You can add 1/4 tsp brewer’s gypsum to add some calcium.